Showing posts with label Window. Show all posts
| 0 comments ]

 
When you call DELL customer support for any help, they will ask for either Service Tag or Express Service Code. You also need service tag to download drivers and documentations from DELL support website.

When you have physical access to the system, you can easily identify the service tag affixed on the body of the server. DELL support site shows the exactly location of the service tag and express code stickers for various DELL equipments.

When you don’t have physical access to the server, you can get the same information remotely from the OS level. Using Windows or Linux command line you can easily get DELL service tag as explained below.

1. Get DELL Service Tag on remote Windows system

Login to the Windows remote-host using VNC or remote desktop connection. Use WMIC on Windows to get service tag as shown below.
 
C:\>wmic bios get serialnumber
SerialNumber
ABCDEF1

Following WMIC command will give make and model number along with service tag.
C:\>wmic csproduct get vendor,name,identifyingnumber
IdentifyingNumber    Name                Vendor
ABCDEF1              PowerEdge 2950      Dell Inc.

If VNC or remote desktop connection to the remote-host is not available,  execute the following from the local-host to get the service tag of the remote-host.

C:\>wmic /user:administrator /node:remote-host bios get serialnumber
SerialNumber
ABCDEF1
[Note: Replace remote-host with the machine name of your remote-host.]
 

2. Get DELL Service Tag on remote Linux system

Login to the Linux remote-host using SSH. Use dmidecode on Linux to get service tag as shown below.
[remote-host]# dmidecode -s system-serial-number
ABCDEF1
 

3. Get DELL Express Service Code From Service Tag

Service Tag is a base-36 integer.  Once you have the Service Tag, you can calculate express service code yourself. Express Service Code is base-10 decimal integer of Service Tag. Dell uses express service code mainly for their support call-routing. When you call dell support, their automated call-routing system may ask you to enter express service code, which you can easily enter in your telephone, as it is just a bunch of numbers, instead of characters.

Use the following online tools to find express service code from service tag and vice-versa.

| 0 comments ]

Computer on the Network with the Same Name

Use the nbtstat -n command to see the name of the computer in the conflict state. The IP address of the node that sent the message is in the data that this command returns. The following example shows what the data may look like in one of these events:

Offset 28 is the IP address of the computer requesting name release. To determine the decimal IP address, invert the four hexadecimal numbers and convert them to decimal numbers separated by periods. Using this method, the IP address of E7 1A 65 16 becomes 22.101.26.231.

The status column of the nbtstat output for the computer in conflict should contain either "Conflict" or "Released."

You can run the nbtstat -a command with the IP address to get the computer name.
Example: nbtstat -A 192.168.1.21

NBTSTAT -A May Return Host not Found Error Message 

To resolve this issue, verify that the NetBIOS Interface device is set to start either Automatically or Manually and that the Messenger service is set to start Automatically. Perform the following steps on the target computer:

  1. Click the Start button, point to Settings, and then click Control Panel.
  2. Double-click the Services icon, and select the Messenger service.
  3. Click Startup, click Automatic, click OK, and then click Close.
  4. Double-click the Devices icon in Control Panel, and select the NetBIOS Interface device.
  5. Click Startup, click either Automatic or Manual, click OK, and click Close.
  6. Restart the computer.
NOTE: Simply starting the NetBIOS Interface device is not sufficient. The NetBIOS Interface device must be reset by a NetBIOS application such as the Messenger service.
Source from here.

| 0 comments ]

Microsoft has announced on the Skype Blog that Windows Live Messenger is to be retired in Q1 2013 (except for in mainland China). Just a fortnight ago Microsoft integrated Messenger and Facebook messaging functionality into Skype version 6 for Mac and Windows. Earlier in mid-September a public beta version had the same functionality. I’ve used both versions and they seem to work without a hiccup with contacts from either platform.

If you still use Messenger or use both Messenger and Skype clients the Skype blog says that you “just need to update to the latest version of Skype, sign in using a Microsoft account, and your Messenger contacts will be there.” It really is as simple as that. It’s important to sign in with your Microsoft ID (if you have both Microsoft and Skype IDs) to get your Messenger contacts in the contact list.
Microsoft assures us it’s not just about shoving users over to a new platform for the sake of software development economy, Messenger users will get additional benefits over their old platform such as:
  • Broader device support for all platforms, including iPad and Android tablets
  • Instant messaging, video calling, and calling landlines and mobiles all in one place
  • Sharing screens
  • Video calling on mobile phones
  • Video calling with Facebook friends
  • Group video calling
An added benefit Microsoft doesn’t mention is that running Skype rather than Messenger has less impact on your system and start-up (if my PC is in any way typical). Also of course it’s better than running both messaging clients at the same time. Skype v6 was updated for both the modern UI and desktop Windows with the flatter and minimal look and feel of the new OS.
You can download the latest version of Skype here.
In recent times Messenger use has declined as Skype use has picked up, according to the Huffington Post. Skype works better in the wide Microsoft ecosystem as a communications program, on TVs and the Xbox for instance. Combine this with the monetisation opportunities for Skype and it was a natural choice for Microsoft.

Reading around however, not everyone is happy with the Skype Blog’s “good news”. Will you miss some features of Messenger that aren’t catered for by Skype?

| 0 comments ]


To use it:
1.Create a new folder.
2.Rename the folder to

GodMode.{ED7BA470-8E54-465E-82
5C-99712043E01C}

(you can change the “GodMode” text, but the following period and code number are essential)
The folder icon will change — double click it to show the GodMode window.

The window shows nearly 50 sections with quick links to configuration options.
Frankly speaking, it’s not a God Mode since all the options are available elsewhere.
It’s more a “all tasks” list — but you may find it easier than stumbling through Windows numerous screens and panels.


other godmodes for Window 7 are:
GodMode.{00C6D95F-329C-409a-81D7-C46C66EA7F33}
GodMode.{0142e4d0-fb7a-11dc-ba4a-000ffe7ab428}
GodMode.{05d7b0f4-2121-4eff-bf6b-ed3f69b894d9}
GodMode.{1206F5F1-0569-412C-8FEC-3204630DFB70}

GodMode.{2227A280-3AEA-1069-A2DE-08002B30309D}
GodMode.{241D7C96-F8BF-4F85-B01F-E2B043341A4B}
GodMode.{62D8ED13-C9D0-4CE8-A914-47DD628FB1B0}
 
try them all ;)
Here is another secret shortcuts ,
Create new folder and name it : 
GodMode. { string from listed below } 
 
Administrative Tools

{D20EA4E1-3957-11d2-A40B-0C5020524153}

All .NET Frameworks and COM Libraries
{1D2680C9-0E2A-469d-B787-065558BC7D43}

All Tasks (Control Panel)
{ED7BA470-8E54-465E-825C-99712043E01C}
AutoPlay
{9C60DE1E-E5FC-40f4-A487-460851A8D915}
BitLocker Drive Encryption (Ultimate edition only)
{D9EF8727-CAC2-4e60-809E-86F80A666C91}
Computer Folder
{20D04FE0-3AEA-1069-A2D8-08002B30309D}
Default Programs
{17cd9488-1228-4b2f-88ce-4298e93e0966}
Ease of Access Center
{D555645E-D4F8-4c29-A827-D93C859C4F2A}
Font Settings
{93412589-74D4-4E4E-AD0E-E0CB621440FD}
Get Programs
{15eae92e-f17a-4431-9f28-805e482dafd4}
Manage Wireless Networks
{1FA9085F-25A2-489B-85D4-86326EEDCD87}
Network and Sharing Center
{8E908FC9-BECC-40f6-915B-F4CA0E70D03D}
Network Connections
{7007ACC7-3202-11D1-AAD2-00805FC1270E}
Network Folder
{208D2C60-3AEA-1069-A2D7-08002B30309D}
Parental Controls
{96AE8D84-A250-4520-95A5-A47A7E3C548B}
Performance Information and Tools
{78F3955E-3B90-4184-BD14-5397C15F1EFC}
Personalization
{ED834ED6-4B5A-4bfe-8F11-A626DCB6A921}
Power Options
{025A5937-A6BE-4686-A844-36FE4BEC8B6D}
Programs and Features
{7b81be6a-ce2b-4676-a29e-eb907a5126c5}
Sync Center
{9C73F5E5-7AE7-4E32-A8E8-8D23B85255BF}
System
{BB06C0E4-D293-4f75-8A90-CB05B6477EEE}
User Accounts
{60632754-c523-4b62-b45c-4172da012619}
Windows Firewall
{4026492F-2F69-46B8-B9BF-5654FC07E423}
Windows SideShow (Warning, caused my system to slow down briefly)
{E95A4861-D57A-4be1-AD0F-35267E261739}
Windows Update
{36eef7db-88ad-4e81-ad49-0e313f0c35f8}

| 0 comments ]

When you log on to a non-genuine copy of Windows XP, the following notification error message "This copy of Windows is not genuine" will pop-up on the logon process.And the nicely said "You may be victim of software counterfeiting" message on the bottom right corner of log-in screen.

Microsoft allows WIndows faithfuls to have 2 options: Get Genuine or Resolve Later. Click on Resolve Later will temporarily bypass the notification and let you login into and use Windows nagged with notification icon and messages, which will randomly appear as balloon notification message with an icon in the notification area (system tray).Clicking on the balloon notification or the notification area icon will lead you to the Windows Genuine Advantage Validation Failure Web page that contains the specifics of the validation failure and the steps that you can take to make the operating system genuine.
To get rid of the WGA notifications that intends to remind you that your Windows is not validated, you can buy a validly licensed copy of genuine Microsoft Windows.

First Method
1. Lauch Windows Task Manager.
2. End wgatray.exe process in Task Manager.
3. Restart Windows XP in Safe Mode.
4. Delete WgaTray.exe from c:\Windows\System32.
5. Delete WgaTray.exe from c:\Windows\System32\dllcache.
6. Lauch Regedit.
7. Browse to the following location:
HKEY_LOCAL_MACHINE\SOFTWARE\Microsoft\
Windows NT\CurrentVersion\Winlogon\Notify
8. Delete the folder 'WgaLogon' and all its contents
9. Reboot Windows XP.
Note: With this method, you may be prompted to install WGA Notifications again which can still be unselected.

Second Method
Another alternative suggested by dman is by using System Restore to restore the PC to a previous restore point that WGA Notifications hasn't kicked in, and then carefully stop KB905474 from been applied to the system. To use System Restore, go to Start --> All Programs --> Accessories --> Systems Tools --> System Restore.
Note: Again, you may be prompted again to install WGA Notification, so it must be bypassed.

Third Method
This method involves using a cracked version of LegitCheckControl.dll to replace the original copy of LegitCheckControl.dll, and thus bypass the WGA validation and make Microsoft believes that your copy of Windows is genuine. To get rid of WGA Notifications warning messages, the patched version of WgaLogon.dll and WgaTray.exe to replace the existing files.
To apply the patch by replacing the files manually, try to end the respective processes in the Task Manager before deleting the existing files. Most likely is you will have to restart your PC in Safe Mode in order to replacing the original copy of LegitCheckControl.dll and related files. However, there has been automatic updater and even cracked WGA installer that automatically apply the patched version of WGA files.

Latest Update for WGA version 1.5.708.0

P/S: More Information From here.

| 0 comments ]

On April 30th, the RC became available to MSDN subscribers and TechNet Plus subscribers.
On Tuesday, May 5 (PST), the RC will be available to everyone via our Customer Preview Program. As with the Beta, the Window 7 RC Customer Preview Program is a broad public program that offers the RC free to anyone who wants to download it. It will be available at least through June 30, 2009, with no limits on the number of downloads or product keys available.

So you don't need rush to make sure ger your copy. When you're ready to download the RC, it'll be waiting for you.

To get the RC please use one of the following links:

IMPORTANT: If you are running Windows 7 Beta you'll need to back up your data (preferably on an external device) and then do a clean install of the Window 7 Release Candidate. After installing Windows 7, you will need to reinstall applications and restore your files. If you need help with the installation process, please see the Installation Instructions.

If you're running Window Vista, you can install Window 7 RC without having to back up and reinstall your programs and data. But to be on the safe side, please do backup your data before you start.

Please note: All users of Window 7 Release Candidate (including Windows Vista users who have upgraded to Release Candidate) must do a clean installation of Windows 7 RTM. Please keep this is mind as you consider downloading the Release candidate as opposed to waiting for the general availabilty release.

Hope that you will join in testing the RC and finishing Windows 7!

Free Window 7 RC Activation Product Keys:

  • MM7DF-G8XWM-J2VRG-4M3C4-GR27X
  • KGMPT-GQ6XF-DM3VM-HW6PR-DX9G8
  • MVBCQ-B3VPW-CT369-VM9TB-YFGBP
  • KBHBX-GP9P3-KH4H4-HKJP4-9VYKQ
  • BCGX7-P3XWP-PPPCV-Q2H7C-FCGFR
  • RGQ3V-MCMTC-6HP8R-98CDK-VP3FM
  • Q3VMJ-TMJ3M-99RF9-CVPJ3-Q7VF3
  • 6JQ32-Y9CGY-3Y986-HDQKT-BPFPG
  • P72QK-2Y3BB-YDHDV-29DQB-QKWWM
  • 6F4BB-YCB3T-WK763-3P6YJ-BVH24

The product keys can be used to activate both 32bit and 64bit Window 7 RC.

Other information about Upgrading from Window 7 Beta to RC Build is at below:

It is possible to upgrade from beta build to RC build using a simple hack. If you want to upgrade from beta to RC, you will need to bypass the check for pre-release as mentioned in the Window 7 blog.
Step to upgrade from Beta to RC:
1. Download the ISO and burn the ISO to a DVD.
2. Copy the whole image to a storage location you wish to run the upgrade from ( a bootable flash drive or a directory on any partition on the machine running the pre-release build).
3. Browse to the sources directory.
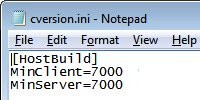
4. Open the file cversion.ini in a text editor like Notepad.
5. Modify the MinClient build number to a value lower than the down-level build. You need to change the value to 7000 as it is the beta version build number.
6. Save the file in place with same name.
7. Run setup like you would normally from this modified copy of the image and the version check will be bypassed.
With this change, you can upgrade from the beta version to the RC build.