Steve Ballmer has just announced during his keynote address in 2009 Internet CES that the public beta for Windows 7 will be released on Friday, January 9, 2009. The public beta of Windows 7 will be available worldwide for everybody to download and get a genuine working product key
HERE (registration required)
BUILDS:
Build 6801
On 8 October 2008, screenshots of Windows 7 build 6801 were leaked. On 28 October 2008, Microsoft distributed build 6801 to attendees at its Professional Developers Conference (PDC). It has since been leaked to bittorrent networks. It features an enhanced taskbar similar to the one in build 6933 although it is disabled by default. An unofficial patch has been released to enable the new taskbar in build 6801.
Pre-Beta 1
Microsoft also demonstrated build 6933.winmain.081020-1842 during the PDC, but did not give it to attendees. On 14 November 2008, screenshots of Windows 7 build 6936 were leaked by Winfuture. On 20 November 2008, Microsoft posted screenshots of build 6948 on the Engineering Windows 7 blog. In early December, WinFutere.de leaked screenshots of Build 6956, which demonstrated a new bootscreen. (Announced by WinFuture since Build 6954) and several improvements. At the WinHEC in China an attendee from the conference leaked a Virtual Hard Disk (VHD) image of Windows 7 Build 6956, then an ISO image was published, in this same site we can see many new screenshots of this build. Lately, Paul Thurrott posted several screenshots on his website of a newer build.
Beta 1
Microsoft has confirmed that Beta 1 will be handed out at MSDN Developer Conference on 13th January 2009 in the form of a DVD.
Release Candidate
The release candidate for Windows 7 will be available after Beta 1.
Final Build
While officially Microsoft has stated that Windows 7 will be released three years after Vista was shipped, the company has indicated that it plans to release Windows 7 in mid-2009, in time for installation on PCs that will ship for the Christmas 2009 buying season.
Update for Windows 7 Beta (KB961367)
Install this update to resolve live and recorded TV issues in Windows Media Center, recorded TV playback issues in Windows Media Player, and MP3 file corruption issues in Windows. After you install this item, you may have to restart your computer. This update is provided to you and licensed under the Windows 7 Pre-Release License Terms.
Minimum hardware recommendations:
- 1 GHz 32-bit or 64-bit processor
- 1 GB of system memory
- 16 GB of available disk space
- Support for DirectX 9 graphics with 128 MB memory (in order to enable Aero theme)
- DVD-R/W Drive
- Internet access (to download the Beta and get updates)
How to Download:
To start off, you need to download a torrent client. uTorrent is a good lightweight client and can be downloaded
here. Once you install uTorrent, head to one of the largest torrent directories listed below.
**After February 10th 2009, Microsoft will no longer be providing downloads for any version of Windows 7 Beta. So need download from above website!! But still can get the product key from microsoft!
Some Activation Keys for people lazy go to registration:
The keys are universal and work with any version of Windows 7 and expire on August 1, 2009. They can be used for an unlimited number of times.
D9RHV-JG8XC-C77H2-3YF6D-RYRJ9
482XP-6J9WR-4JXT3-VBPP6-FQF4M
RFFTV-J6K7W-MHBQJ-XYMMJ-Q8DCH
JYDV8-H8VXG-74RPT-6BJPB-X42V4
7XRCQ-RPY28-YY9P8-R6HD8-84GH3

 YES!! Then you need copy all the below text into the Notepad file (for Support Information):
 Now you need create 1 logo for your own...Example like this:
 This size of that logo is 180 x 114 cannot be bigger but can be smaller because bigger logo can't be show. After that save as oemlogo.bmp file.
 Copy to "C:\WINDOWS\system32".
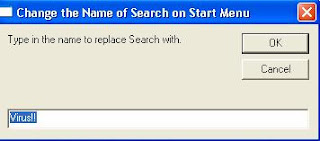

 After that double click the file your will see this screen:
 Type the name as your want!! This example is rename the run as "Don't Click"!
 Wish You all can enjoy it.....^^
 Installed, open the Seagate DiscWizard, figure, the main interface has four options. Click on "Image Backup and Image Restore" (1) began to set up for the system image file.
 Click Image Backup (2).
 There are four options here, too, point check My Computer (3) Preparation of sub-image file, and the remaining sub-prepared to use only paid version. Then select Next. Then check-point "Disc and partitions", click Next to the next step.
 Select Backup to disk, usually the boot drive C (4). Then steps can only select the first "Create a new full image backup A and then next.
 In this simply select Use default option (5).
 Select the image file should be prepared at the location, usually the Backup disk to another partition D (6), input image file name, click Next.
 Notes for the image file set up (7), convenient time to view the next restore.
 As long as the press after the Proceed (8), will begin to set up an image file.
 Quick StartUp main interface lets you more easily view a list of startup programs. If we were to abolish the boot program to run automatically, as long as the use of a mouse click on the program (1), do not check will be, very simple.
 You can also select the program, and then right-click, you can directly delete the program (2) automatically.
 If you want to add programs to run automatically at startup, you may press the "Add program" (3), then select the program.


 3. Appears
 1.At
1.At  3.Clicks on the right page margin position
  1.Clicks on
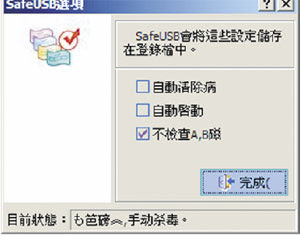
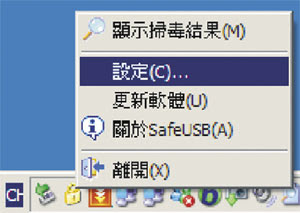
 Open SafeUSB directly after the small yellow lock will appear in the system out, as long as the plug in one drive, it will automatically scan.