| 0 comments ]


To use it:
1.Create a new folder.
2.Rename the folder to

GodMode.{ED7BA470-8E54-465E-82
5C-99712043E01C}

(you can change the “GodMode” text, but the following period and code number are essential)
The folder icon will change — double click it to show the GodMode window.

The window shows nearly 50 sections with quick links to configuration options.
Frankly speaking, it’s not a God Mode since all the options are available elsewhere.
It’s more a “all tasks” list — but you may find it easier than stumbling through Windows numerous screens and panels.


other godmodes for Window 7 are:
GodMode.{00C6D95F-329C-409a-81D7-C46C66EA7F33}
GodMode.{0142e4d0-fb7a-11dc-ba4a-000ffe7ab428}
GodMode.{05d7b0f4-2121-4eff-bf6b-ed3f69b894d9}
GodMode.{1206F5F1-0569-412C-8FEC-3204630DFB70}

GodMode.{2227A280-3AEA-1069-A2DE-08002B30309D}
GodMode.{241D7C96-F8BF-4F85-B01F-E2B043341A4B}
GodMode.{62D8ED13-C9D0-4CE8-A914-47DD628FB1B0}
 
try them all ;)
Here is another secret shortcuts ,
Create new folder and name it : 
GodMode. { string from listed below } 
 
Administrative Tools

{D20EA4E1-3957-11d2-A40B-0C5020524153}

All .NET Frameworks and COM Libraries
{1D2680C9-0E2A-469d-B787-065558BC7D43}

All Tasks (Control Panel)
{ED7BA470-8E54-465E-825C-99712043E01C}
AutoPlay
{9C60DE1E-E5FC-40f4-A487-460851A8D915}
BitLocker Drive Encryption (Ultimate edition only)
{D9EF8727-CAC2-4e60-809E-86F80A666C91}
Computer Folder
{20D04FE0-3AEA-1069-A2D8-08002B30309D}
Default Programs
{17cd9488-1228-4b2f-88ce-4298e93e0966}
Ease of Access Center
{D555645E-D4F8-4c29-A827-D93C859C4F2A}
Font Settings
{93412589-74D4-4E4E-AD0E-E0CB621440FD}
Get Programs
{15eae92e-f17a-4431-9f28-805e482dafd4}
Manage Wireless Networks
{1FA9085F-25A2-489B-85D4-86326EEDCD87}
Network and Sharing Center
{8E908FC9-BECC-40f6-915B-F4CA0E70D03D}
Network Connections
{7007ACC7-3202-11D1-AAD2-00805FC1270E}
Network Folder
{208D2C60-3AEA-1069-A2D7-08002B30309D}
Parental Controls
{96AE8D84-A250-4520-95A5-A47A7E3C548B}
Performance Information and Tools
{78F3955E-3B90-4184-BD14-5397C15F1EFC}
Personalization
{ED834ED6-4B5A-4bfe-8F11-A626DCB6A921}
Power Options
{025A5937-A6BE-4686-A844-36FE4BEC8B6D}
Programs and Features
{7b81be6a-ce2b-4676-a29e-eb907a5126c5}
Sync Center
{9C73F5E5-7AE7-4E32-A8E8-8D23B85255BF}
System
{BB06C0E4-D293-4f75-8A90-CB05B6477EEE}
User Accounts
{60632754-c523-4b62-b45c-4172da012619}
Windows Firewall
{4026492F-2F69-46B8-B9BF-5654FC07E423}
Windows SideShow (Warning, caused my system to slow down briefly)
{E95A4861-D57A-4be1-AD0F-35267E261739}
Windows Update
{36eef7db-88ad-4e81-ad49-0e313f0c35f8}

| 39 comments ]

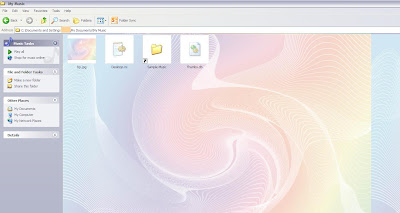
Here I will posting 3 methods to have any desired wallpaper as background image in any folder in Windows XP:

A. Using Desktop.ini Hack to Set a Wallpaper as Folder Background Image:

1. Open Command Prompt and set folder attribute to "system". Suppose there is a folder "Setup" in "C:\" drive, in which you want to set a wallpaper as background image. So give following command in Command Prompt:

attrib +s C:\Setup

It'll change the attribute to "system".

2. Now open Notepad and paste following code:

[ExtShellFolderViews]
{BE098140-A513-11D0-A3A4-00C04FD706EC}={BE098140-A513-11D0-A3A4-00C04FD706EC}
[{BE098140-A513-11D0-A3A4-00C04FD706EC}]
Attributes=1
IconArea_Image=path_of_the_wallpaper
IconArea_Text=0x00000000

Now change "path_of_the_wallpaper" to the exact path of the wallpaper which you want to set as background. Suppose the wallpaper is stored in "D:\Wallpaper\Image1.jpg", then the code will be as following:

[ExtShellFolderViews]
{BE098140-A513-11D0-A3A4-00C04FD706EC}={BE098140-A513-11D0-A3A4-00C04FD706EC}
[{BE098140-A513-11D0-A3A4-00C04FD706EC}]
Attributes=1
IconArea_Image=C:\Wallpaper\bp.jpg
IconArea_Text=0x00000000

NOTE: If you copy the wallpaper in the same folder which you are editing, then you can simply put the wallpaper name in the file. e.g. if you copy the "bp.jpg" file in "Setup" folder, then the code will be as following:

[ExtShellFolderViews]
{BE098140-A513-11D0-A3A4-00C04FD706EC}={BE098140-A513-11D0-A3A4-00C04FD706EC}
[{BE098140-A513-11D0-A3A4-00C04FD706EC}]
Attributes=1
IconArea_Image=bp.jpg
IconArea_Text=0x00000000

"IconArea_Text" stands for the text color, you can change it to white, yellow, blue, black or any other color. You just need to know the hexa-decimal number of the color and then replace the code in "IconArea_Text" section. A few most used color codes are as follows:

Black - 0x00000000
White - 0x00FFFFFF
Green - 0x0000FF00
Blue - 0x00FF0000
Purple - 0x00C000C0
Red - 0x000000FF
Yellow - 0x0000FFFF
Indigo - 0x00FFFF00

3. Now save the file with name "Desktop.ini" (including quotes) and copy the file in the desired folder which is "Setup" in our example.

4. Thats it. Close the folder and re-open it. Now it should show the wallpaper as background.

B. Using the Same Method of "IEShwiz.exe" file used in Windows 9x/NT/2000:

1. Copy "IEShwiz.exe" file from Windows 98/Me/NT/2000 and paste in "%windir%" directory (C:\Windows, if your Windows is installed in C:\ drive).

2. Now open regedit and goto:

HKEY_LOCAL_MACHINE\SOFTWARE\Classes\Directory\shell\

Now under this key, create a new key "Customize This Folder". Now select this newly created key and create another key under it with the name "Command". Select this new key "Command" and change the value of "Default" in right side pane to IESHWIZ.EXE %1

3. That's it. Now open any folder and right-click, you'll get an option "Customize This Folder". Click on it and follow the wizard and you'll be able to set a wallpaper as the background and to change font color.

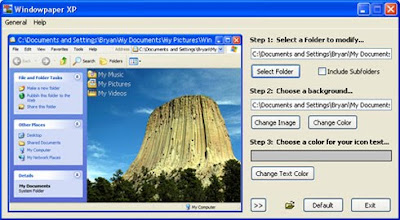
C. Using 3rd party software "Windowpaper XP" to do the task easily:

1. Download "Windowpaper XP" from following link:
2. Install the software and you can easily change the folder background and font colors.

| 0 comments ]


Step 1:Open the notepad.
Step 2:Type : CreateObject("SAPI.SpVoice").Speak "I Love You"
Step 3:Save the file as .vbs (eg. I Love You.vbs)
Step 4:Execute that file via double clicking it. You will know if it is a guy or girl through the sound.

| 0 comments ]

If there is another administrator account that you can log into, then jump to step 7 after logging into that account.
However, if you can't get to any accounts at all, then start at step 1.

1. Restart your computer and hit F8 multiples times until you see a menu-like screen, if you see the Windows splash screen then repeat this step.
2. Highlight and hit enter on Safe Mode with Command Prompt. Try logging in there. If it still doesn't work, then go to step17.
3. If you are able to login, once a command prompt pops up, type: net user administrator password /active:yes (you can specify whatever password you want for the administrator account.)
4. If you get a message saying "The command completed successfully", then restart your computer by typing: shutdown -r.
5. Boot up again pressing F8, but this time choose just Safe Mode.
6. You will be able to login as Administrator with the password you set in Step 3.
7. Hit (windows logo)+R.
8. Type regedit.
9. Once the registry editor opens up, look for HKEY_LOCAL_MACHINE\SOFTWARE\Microsoft\Windows NT\CurrentVersion\ProfileList
10. In the left pane, find the one that starts with S-1-5..... and ends with .BAK; if you don't find one, skip to step 15.
11. Right click it and click Rename, then change the .BAK to .BK
12. Right click the one with the same numbering but without the .BAK and add .BAK add the end.
13. Right click the one that you renamed to .BK and clickRename, delete the .BK
14. Eventually, you have switched the .BAK from the end of the second entry to the first. That should probably fix your problem.
15. If you didn't find a .BAK then try this: Open Windows Explorer to C:\Users\Default\AppData\Local\Application Data
16. If you find another Application Data below the one you're on, then delete it. That should probably also fix your problem.
17. If you can't login in Safe Mode, then reboot and hit F8 until you see the menu again, then hit enter highlighting Repair Your Computer.
18. Wait until all Windows Files finish loading, then hitNext when it asks keyboard language.
19. Try logging in here also, choose your user from the dropdown menu, and type the password, then jump to step 23.
20. If that still doesn't work, then if you have your Windows Installation CD still, put it in and restart your computer.
21. Hit F12 until you see a menu of boot options, choose Boot from CD.
22. Choose keyboard language then hit next. Find Repair Your Computer from a little below the center left.
23. Choose Open Command Prompt and type: net user administrator password /active:yes (here again you can specify a password)
24. Close the command prompt and click Restart and jump to step 5.

**To disable the administrator account, type this in an elevated command prompt: net user administrator /active:no

| 0 comments ]


Most of the time the virus are programmed to disable Windows Task Manager, Regedit, command prompt, folder options and etc. These restrictions are meant to prevent a normal computer user from using these built-in Windows diagnostic tools to remove the virus from computer.

There are some virus that will cause destruction such as encrypting recently used files so you are forced to buy the decryption key from the virus programmer. Then there’s another type of virus such as BDS.Mirc.Backdoor that will hide your document files by setting the hidden and system attributes to the file. You can still see the files if you set to show hidden files and folders plus disabling hide operating system files. If the virus is capable of restricting Folder Options, chances are you think that your files has been wiped out by the virus but in fact it is hidden in your system.

Here’s how to show hidden files and folders or system files.
1. Go to Control Panel and open Folder Options.
2. Go to View tab and select “Show hidden files and folders”. Then uncheck “Hide extensions for known file types and Hide protected operating system files”. Do take note that some virus that are still active in computer will revert the changes that you made. So make sure your computer is clean from virus first by scanning with an antivirus program.

3. Try to look for your missing files in your directory or hard disk.
4. This is the method of doing it without using any software. Just run com
mand prompt (Start > Run > CMD), type the command attrib -H -S C:\path\to\your\files. You can also use the asterisk character to define multiple extensions. For example, attrib -H -S C:\nick\*.* would remove the hidden and system attribute of all files in nick folder at C drive.

Others method can refer here

Now if you want remove attrubutes for all files in all folders on whole flashdrive do this:
attrib -r -s -h /S /D
this command will remove attrubutes for all files folders and subfolders:
-read only
-system file
-is hidden
-Processes matching files and all subfolders.
-Processes folders as well